How to Create Tasks with Task Scheduler Windows 11
This article will show you how to use a scheduler in Windows 11 to build an automated process.
1 How to Create Tasks with Task Scheduler Windows 112 Creating Automated Task Using Task Scheduler 2.1 Create an Automated Task With Basic Settings2.2 Creating Task In Windows 11 With Advanced Settings3 Conclusion
Creating Automated Task Using Task Scheduler
You can create an automated task using the scheduler in Windows 11 with two different settings modes. You can either create a task with basic settings (also known as the basic task) or create a task with advanced settings.
Create an Automated Task With Basic Settings
To create an automated task using the scheduler in Windows 11 with basic settings, follow the steps given below-
Open the Start Menu by clicking on the Start Icon or pressing the Windows key on your keyboard. In the start menu, search for task scheduler and open it.In the task scheduler, right-click on the Task Scheduler Library in the left sidebar, and then click on the new folder. Name the folder whatever you want.
Now expand the Task Scheduler Library and right-click on the folder that you created. Click on create a basic task. This will lead you to create a basic task wizard. Enter the name and description of the task. Once done, click on next.
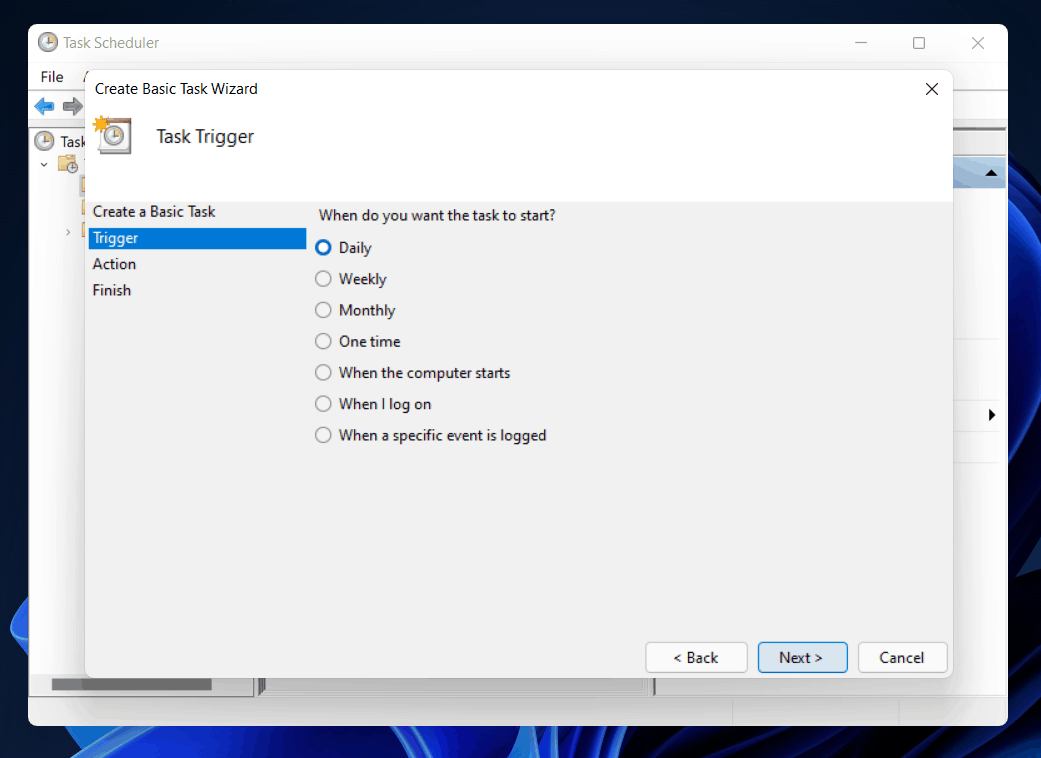
Next, you will be asked when you want the task to start. You can set the time like daily, weekly, monthly, one time when the computer starts when I log on, and when a specific event is logged. After doing so, click on next.
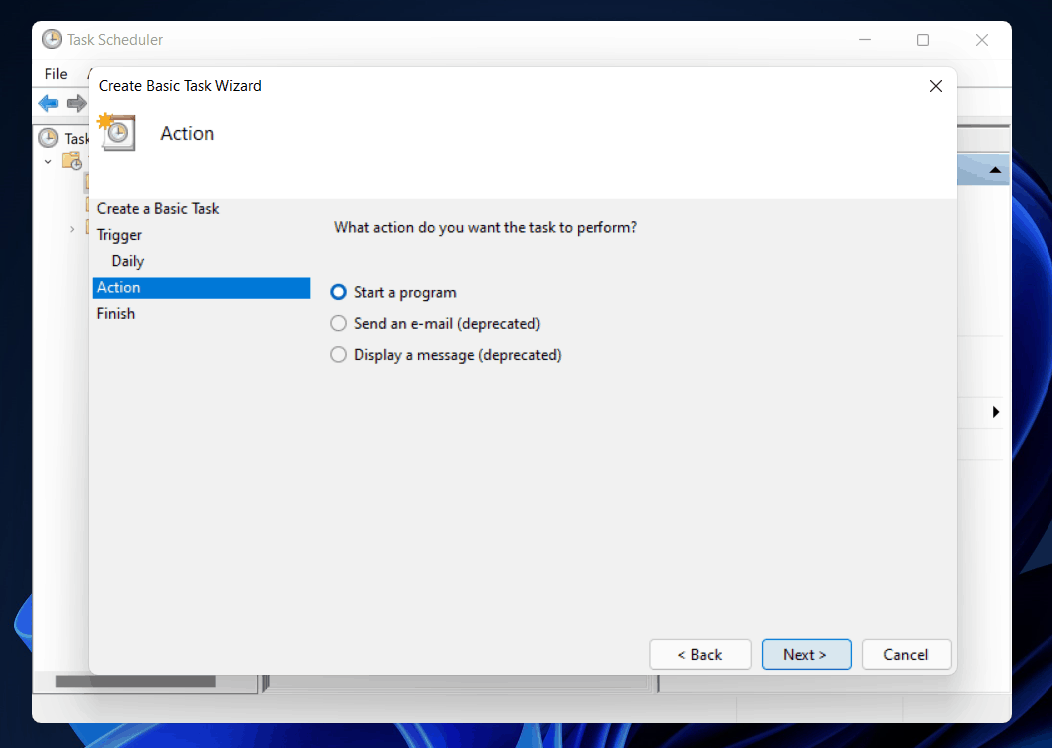
Now you will be asked to set the time for the program to start. Once you are done with setting the time, click on the next. After doing so, you will have to set the task you want to perform. You will be given three options- start a program, send an email, and display a message.
Start a program: When you select this option, you will be asked to select the program/script that you want to start as per the schedule. Moreover, you can also add arguments and start it. However, these are optional.Send an Email– If you select this option, you will have to enter the recipient’s email address along with your email address. You can type in the subject, text and also add an attachment to the email.Display a Message- This will display a message on your screen. You will have to add the title as well as the message when you select this option.Once done, click on Finish, and the task will be created successfully.
You can learn more about Windows 11 Media Creation Tool
Creating Task In Windows 11 With Advanced Settings
If you want your automated task to be more specified in action and with triggering conditions, you can use advanced settings. Let’s discuss how you can create an automated task using the scheduler in Windows 11 with advanced settings.
Follow the step 1 and 2 of the above method. Expand the Task scheduler library and right-click on the folder you created. Now click on create a task. Now in the next window, you will have to give the name and the description of the task. You can also change the user or group for which you want to run the task. On the same window, you can set whether to run the program when the user is logged in or run whether logged in or not. You can also set whether you want to run it with the highest privileges. Once done, click on OK.
Next, you will have to specify the condition for the task to get triggered. Click on New and then specify the triggering condition of the task. You can specify whether you want to run the task on a schedule, log on, idle, on an event, at task creation/modification, connected or disconnected from the session, etc. You can then specify the conditions. After doing so, click on OK. You can give multiple conditions from here.
Next, you will have to specify the action of your task. Click on new to set the action of the task. You can select whether the action will start a program, send an email, or display a message. Customize the task as per your preference.
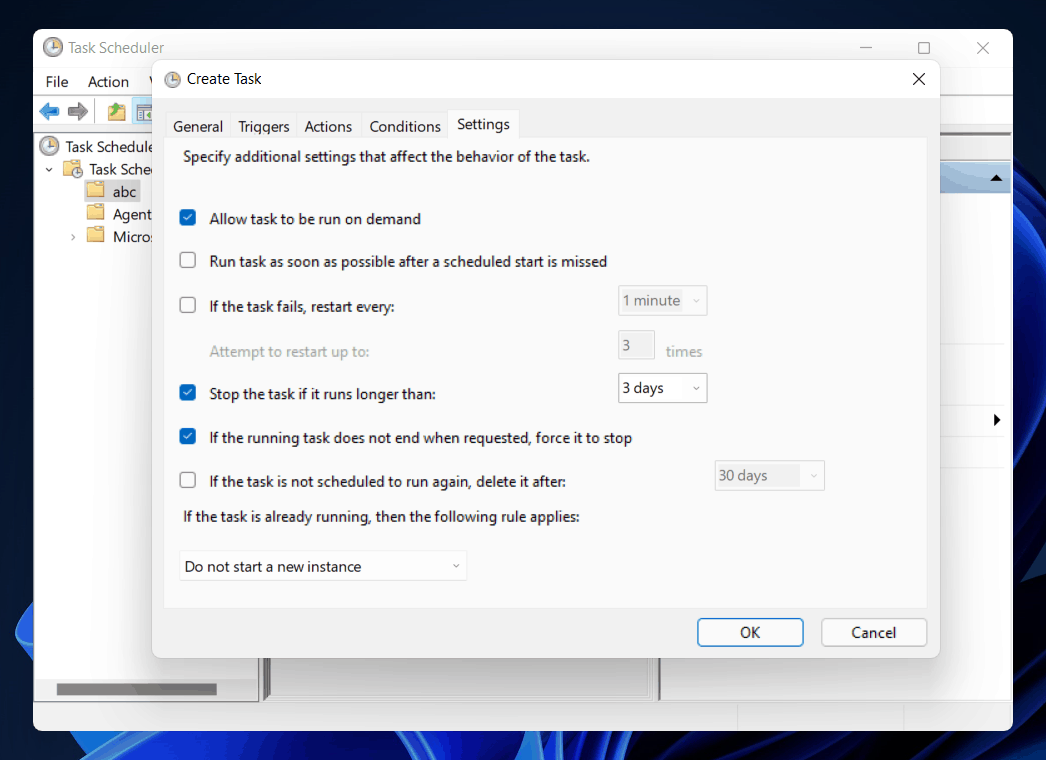
Next, you can specify the conditions for your tasks to run. You can set conditions for idle state, power, and network. In idle, you can set conditions like starting the task when your PC is idle for a particular time, stop when not idle, restart when the idle state resume. In power, you can set whether you want to run the task when the PC is on AC power, stop the task when the computer is running on battery power, and also wake the computer to run this task. You can set the task to start when the network connection is available in the network section. You can then choose between the connections you can connect to, and the task will trigger.Next, you can specify additions settings affecting the behavior of the task. Once done, click on OK, and the task will be created.
If you want to edit or delete the tasks you created, then right-click on the task and select Edit to edit it or delete to delete it. Visit the following articles for more helpful guides and answers to frequently asked questions about Windows 11:
How To Speed Up Windows 11 and Optimize PerformanceHow to Get Refresh Button BackHow to Get Adobe Reader for Windows 11
Conclusion
That’s the complete process of creating a programmed task using a task scheduler in Windows 11. You can either create the task using basic settings or an advanced setting. The only difference between them is, advanced settings allow you to add more conditions for the task to get triggered, while basic settings do not. You can choose any settings as per your preference.
Δ